Twenty One Comfort Recipes for Winter
When the weather turns cold I always find myself wanting to nest. To me, winter is the perfect time to whip out my favorite comfort foods while staying nice and warm at home. Nothing helps me keep the winter blues away quite like cooking up my favorite recipes.
Of course, I haven’t always turned to cooking for comfort; I actually used to hate being in the kitchen! I never thought it would be something I would even be able to do without harming myself or the house, let alone want to do. However, the pandemic gave me time to experiment and as a result I learned to enjoy the act of cooking. Here is a round-up of my comfort favorite recipes I’ve found; believe me, if I can make these (and enjoy it) then you can as well!
Twenty One Comfort Recipes for Winter
If you don’t love scrolling, feel free to select the category you are interested in and jump ahead!
Artichoke Soup
I am a huge artichoke fan. I could honestly eat artichokes everyday. My husband, however, does not feel the same and so I was so excited when I made this soup for him and he actually loved it - it’s the surefire way for me to have artichokes at home!
This was also one of the first things I learned to make. The recipe is fairly simple and it’s surprisingly filling thanks to the potato, though we often pair it with grilled cheese.
You could also easily make this dairy free or vegan by replacing the chicken stock with vegetable stock and eliminating the mascarpone.
Ingredients
2 tablespoons extra-virgin olive oil
2 leeks, white part only, washed well and chopped
1 clove garlic, minced
1 small potato, peeled and chopped
1 (8-ounce) package frozen artichoke hearts, thawed (I’ve used canned as well, since my grocery stores tend not to carry frozen. As long as they are in water and not oil they work fine)
2 cups chicken stock
Season with salt and pepper
2 tablespoons plus 1/3 cup mascarpone cheese
2 tablespoons chopped chives, for garnish
Instructions

Artichokes are the star of this comforting soup
I am a big fan of mise en place so I first start by getting the leeks, garlic and potato all chopped and set aside. Then I like to use a dutch oven instead of a large pot (though either works). First you’ll heat the olive oil before adding the leeks and garlic and stirring. Then you’ll add in the potatoes, stirring frequently.
After five minutes, add in the artichokes, stock and salt and pepper and cook until the potatoes and artichokes are tender, usually about 20 minutes.
Next for the fun part - you’ll be using an immersion blender to puree the soup. If you don’t have an immersion blender you can use a regular blender but you’ll want to do that in batches if that is the case. You’ll add in the two tablespoons of mascarpone before blending again.
Next you’ll put the rest of the mascarpone in a small bowl and stir it to soften. This will go on top of your soup as part of the garnish.
Once blended, ladle the soup into a serving bowl and top with a dollop of the softened mascarpone and the chopped chives.
Roasted Red Pepper & Gouda Soup
This soup is a little more work, but it is so worth the effort. The roasted red peppers add great flavor and the creaminess of the gouda elevates the dish. My suggestion is to use smoked gouda - it gives another layer to this decadent soup.
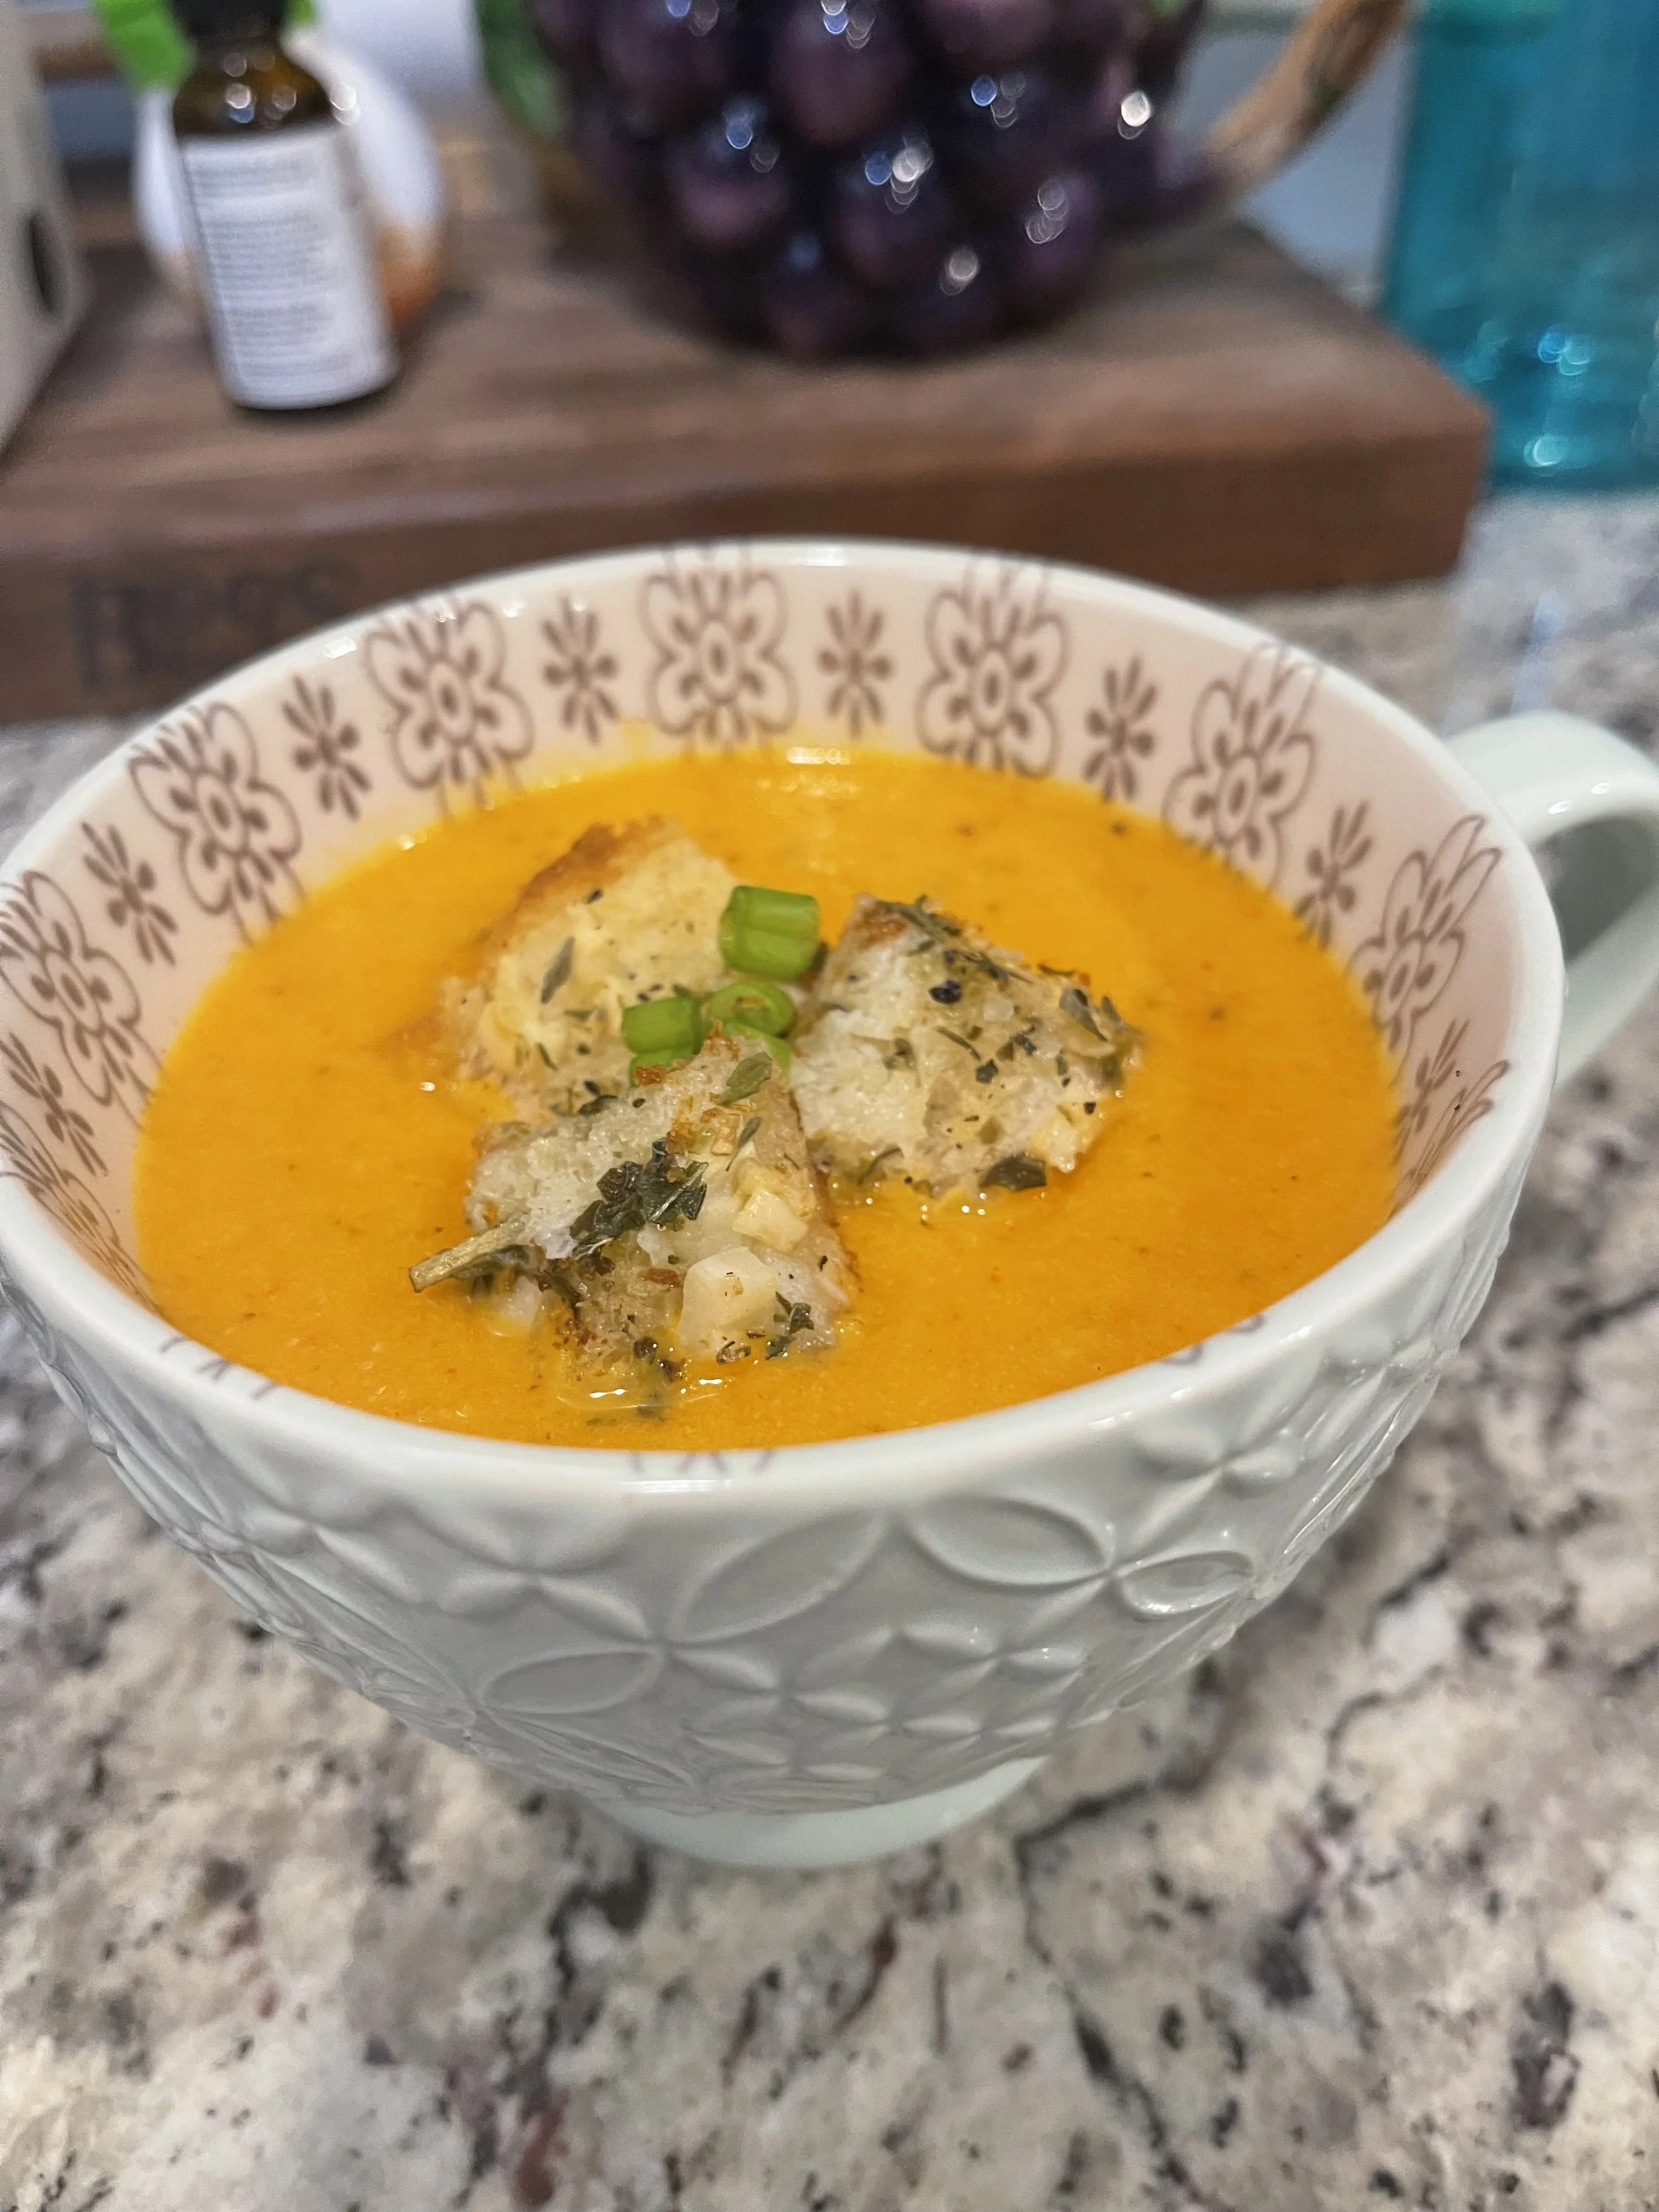
Smoked gouda and homemade croutons give this soup a little extra pop
Ingredients
4 tablespoons butter
3 medium red bell peppers
I like to roast them before removing the skin and seeds but you can also use the ones that come roasted in a jar
1/2 yellow onion, diced
1 large carrot, chopped
1 celery rib, chopped
4 cloves garlic, minced
3 1/2 cup chicken broth (if you are vegetarian you can sub out the chicken with vegetable stock)
1/4 teaspoon thyme
1/4 teaspoon oregano
1/4 teaspoon dried basil
1/4 teaspoon dried tarragon
Dash of cayenne pepper
Salt and pepper to taste
1 teaspoon sugar
1/2 cup heavy cream
1 cup grated gouda cheese (I like using smoked gouda)
Chopped chives, as garnish
Instructions
First - let’s roast some peppers!
Line a baking sheet with foil while your broiler preheats. You’ll place your peppers right on the foil and roast until charred, rotating to get each side. This should take about five minutes per side depending on how hot your broiler gets. Once they are roasted and cooled, peel the skin off of the peppers and remove the stems and seeds before slicing into strips and setting them aside.
Now it’s time for the soup itself. You melt the butter in a large pot over medium heat (I use my dutch oven). Add the onion, garlic, celery, carrot and all of the spices. You’ll want to stir and cook until the carrots are tender, which should take about eight minutes.
Next you’ll add those roasted peppers to the broth. Bring it to a boil and then simmer for five minutes before pureeing the soup with your immersion blender or food processor (in batches). Once pureed you’ll add the cream, gouda and sugar until the gouda has melted.
Ladle the soup into a bowl and top with chives. I also like to toast up come garlic bread and chop it into croutons for a nice crunch to balance out the creamy texture of the soup.
Lasagna Soup
Yes, this is a case of TikTok made me do it. When I saw this hearty soup pop up on my FYP I knew I had to try it; growing up my mom made lasagna all of the time and it just makes me think of home. What could possibly be more comforting in the cold winter months than eating a soup that feels like a hug from your mom? Plus, it’s a nice change of pace if you want a noodle soup other than the standard chicken.
The nice thing about this soup is it is also super easy to make. It’s a pretty quick and easy option for a busy weeknight.
Ingredients
2 teaspoons olive oil
1-1/2 lbs. Italian sausage or ground beef (I like using hot Italian sausage for a spicy twist)
1 extra-large yellow onion, chopped
4 large garlic cloves, minced
2 teaspoons dried oregano
1/2 teaspoons kosher salt
1/4 teaspoons ground black pepper
1/4 teaspoons crushed red pepper flakes
3 tablespoons tomato paste (add more for even deeper tomato flavor)
2 (14.5-ounce.) cans fire-roasted diced tomatoes
2 bay leaves
6 cups chicken stock
8 ounces mafalda or fusilli pasta
1/2 cup fresh basil leaves, sliced thinly
For the “cheesy yum”
8 ounces ricotta
1/2 cup grated Parmesan cheese
1/4 teaspoon kosher salt
freshly ground black pepper, to taste
Instructions
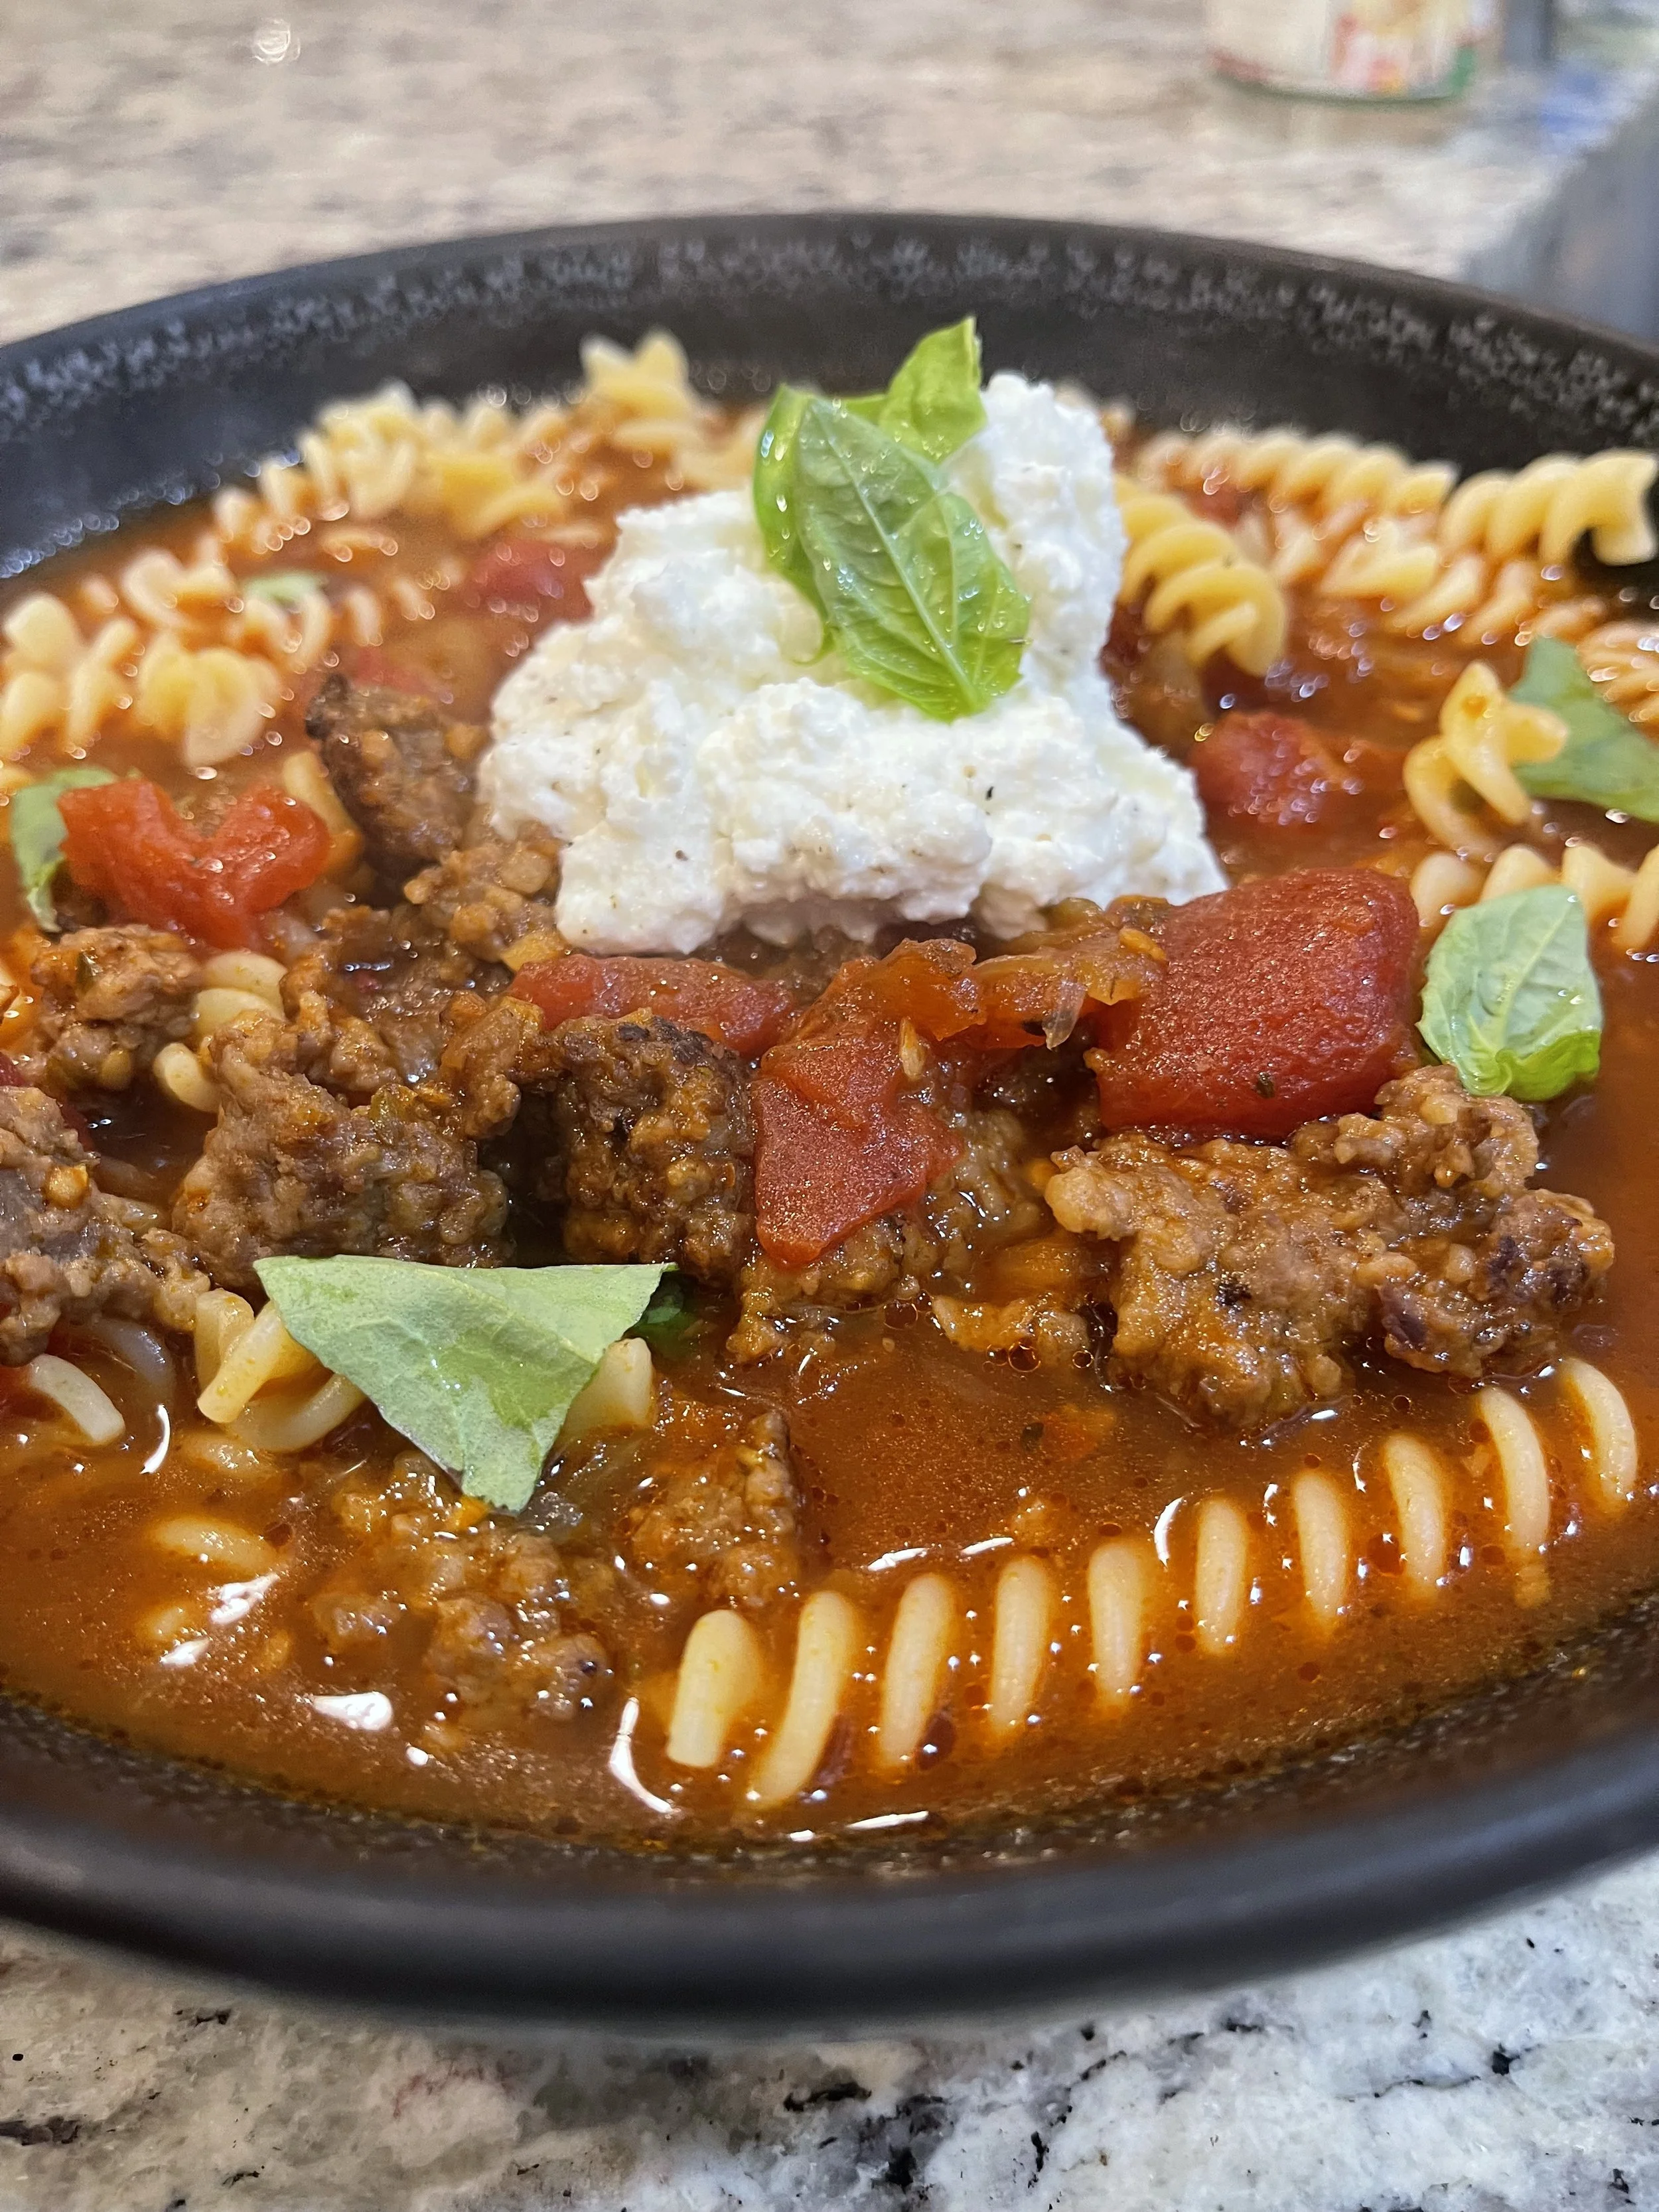
The “cheesy yum” makes this more decadent
Start off by heating the olive oil in a large pot or dutch oven over medium heat. Once heated, you’ll add the sausage and brown it while breaking it up into small piece with a wooden spoon.
Next you’ll add in the onion, garlic, oregano, salt, pepper and red pepper flakes. You’ll want to cook until the onion is softened and the meat has been browned. This will take about seven minutes.
Stir in the tomato paste and cook for two minutes before adding in the diced tomatoes, bay leaves and chicken stock. Bring the broth to a boil before reducing to a simmer for about fifteen minutes.
While it’s simmering, cook the pasta in another pan until it is al dente. You will want to be careful not to overcook - I honestly always opt for way less time than recommended on the box because I hate overcooked pasta. Once ready to your liking, drain and set aside.
Now for the cheesiness! In a bowl, combine the ricotta, Parmesan, salt and pepper. This will go on top of the soup.
Add your pasta to a bowl and ladle your soup over top before adding a dollop of the “cheesy yum” and the fresh basil leaves and enjoy!
Beet Salad with Goat Cheese
Since beets are a cool weather crop, you’ll usually see them popping up on menus in the fall and winter. I am always excited about this, as I love beets.

Roasting beets is a challenge but worth it
This salad is super simple and includes goat cheese. After smoked gouda, I would say goat cheese is my absolute favorite and so I am obviously a huge fan of any beet salad where that is included. This is a delicious way to get your greens in during the colder months.
Ingredients
For the salad:
3 large beets peeled and cubed
5 ounces mixed salad greens
4 ounces goat cheese crumbled
For the dressing:
1/4 cup orange juice
1/4 cup balsamic vinegar
1/4 cup extra virgin olive oil
2 teaspoons sugar optional
1/2 teaspoon salt
Instructions
In my opinion, the biggest challenge with this salad is getting the beets cubed and ready. To do that, you’ll want to peel off the outer layer and remove the stems before chopping into cubes and then steaming them in water until tender. You can also roast in the oven. Whichever way you choose to prep your beets, you’ll then want to cool them in the fridge.
Or you can be lazy like me and opt for canned or jarred. I know it’s not as good but I will sometimes do this if I’m not wanting to risk staining my hands or if I don’t have a ton of time to prepare the beets.
Next you’ll rinse the salad greens, dry (a spinner works great for this if you have one) and combine in a bowl. Top the lettuce with the cooled beets and crumbled goat cheese.
Once ready, you’ll make the dressing by combining the orange juice, balsamic, olive oil, sugar and salt in a bowl (I also like to add pepper). Whisk away to mix it all together and then drizzle over the salad before serving.
Winter Fruit Salad
As I mentioned, I can really struggle with getting my fruits and vegetables in during the colder months. However, I know eating a blueberry scone isn’t going to cut it so I had to find an alternative. That’s why I love this winter salad. It takes delicious seasonal fruits and combines them for a delicious sweet and tart salad. Plus it’s super easy - no oven needed!
Ingredients
For the salad:
5 clementines, peeled and separated into segments
2 pears, cored and sliced
2 apples, cored and sliced
1 1/2 cups of pomegranate seeds (I usually have a hard time finding pomegranates at the store, so I’ll look for the containers of pomegranate seeds already packaged).
4 kiwis, peeled and sliced
For the syrup:
3 Tbsp honey
2 Tbsp fresh lime juice, from 1 medium lime
2 Tbsp fresh lemon juice, from 1 medium lemon
Instructions
Throw all of the prepared fruit into a large mixing bowl and set aside.
Next, using a measuring cup, stir together the honey, lemon juice and lime juice until the honey is completely dissolved. If you are having a hard time getting the honey to dissolve, you can warm it for about 10 seconds in the microwave.
Drizzle the dressing over the salad and then toss to combine. You can store this in the fridge if tightly covered for up to six hours, but I find it is best to eat right away.
Boursin Bites
It’s yet another case of a TikTok find! This is another perfect appetizer to serve up when hosting a holiday party or having friends over for a night of wine and cheese. It’s easy and it looks beautiful, which is always the best. Who doesn’t love something simple to make but also still impressive to guests?
Ingredients
1 sheet of puff pastry
12 cherry tomatoes, halved
1 tablespoon of Olive Oil
1 tablespoon balsamic vinegar
1 tablespoon thyme leaves
1 Boursin cheese - opt for the garlic and herbs
Salt and pepper to taste
Balsamic glaze and basil for garnish
Instructions
Preheat the oven to 400 degrees fahrenheit. While that heats, spray a muffin tin with cooking spray. Divide the puff pastry into 12 equal parts and place each one in the muffin cups.
Next you’ll combine the tomatoes, olive oil, balsamic vinegar, thyme leaves, salt and pepper in a bowl and set aside.
Divide the Boursin into 12 equal parts, placing a drop in the center of each puff pastry cup. Top each with two halves of the marinated cherry peppers and then put in the oven to bake for 15 - 18 minutes.
After their done baking, let each pastry bite cool before drizzling with the balsamic glaze and garnishing with a basil leaf.
Butternut Squash Hummus
Here’s the thing…I don’t actually love hummus.
I know, I know. It’s pure blasphemy, but there is just something texturally I don’t love about the dip. I can enjoy it as a spread on a sandwich with other items but it’s not something I’m going to seek out to dip my veggies in. That being said, I do love butternut squash but don’t always want to make soup. Enter butternut squash hummus, something so good even I’ll enjoy it!
This savory hummus is a great gluten free option to serve when hosting or just when you want a healthy snack, which I find can be hard to manage during the months when we are all nesting from the cold.
Ingredients
1 cup cubed butternut squash
4 cloves garlic (skin on)
4 cloves garlic (peeled + minced)
2 Tbsp lemon juice
1 15-ounce can chickpeas (lightly rinsed + drained)
1/3 cup tahini
3-4 tablespoon olive oil (plus more for roasting garlic)
Sea salt + pepper (to taste)
1/2 cup fresh parsley (chopped…I leave this out simply because I hate parsley, but that’s just me)
1/4 teaspoon ground cinnamon
1/2 teaspoon ground cumin
1/4 teaspoon smoked paprika (this is optional)
Instructions
Start by preheating the oven to 400 degrees fahrenheit. While that heats, add cubed butternut squash and the unpeeled garlic cloves in a bowl before drizzling with olive oil, salt and pepper. Toss to combine everything and then transfer onto a baking sheet and baking for 15-20 minutes. You’ll want to leave these in the oven until the squash is fork tender and the garlic turns a golden brown. Then remove.
Let this mixture cool for about five minutes before peeling the garlic and adding it to a food processor or blender with the squash, freshly minced garlic, lemon juice, chickpeas, tahini, olive oil, salt pepper, parsley (unless you are like me), cinnamon, cumin and smoked paprika.
You’ll puree this mixture until it’s creamy and smooth. If it is too thick, add a little more olive oil or a bit of water. You can also adjust the seasonings to taste. Then serve it up with whatever your favorite vessel, which can be something like pita or roasted carrots (a great option if keeping it gluten free).
Caramelized Onion and Goat Cheese
I made these for a friendsgiving this year and they were a big hit. The caramelized onion mixed with the goat cheese give it great flavor and it tastes like a hearty appetizer, which is something I always look for in the colder months.
Caramelizing the onions is a little intensive, but once you get the hang of it it’s pretty easy and even fun to make.
Ingredients
2 tablespoons olive oil
2 medium sweet onions, thinly sliced
1 teaspoon salt
1 tablespoon packed brown sugar
1 tablespoon balsamic vinegar
French bread baguette, sliced
Nonstick cooking spray
1 package (4 oz) chèvre (goat) cheese, softened
1 package (3 oz) cream cheese, softened
1 teaspoon chopped fresh thyme or oregano leaves
Ingredients
First get the onions caramelizing. You’ll use a nonstick skillet to heat oil over medium-high. Stir in the onions and cook uncovered for 10 minutes, stirring every few minutes.
After 10 minutes, reduce the heat to medium-low and add in the salt, brown sugar and vinegar. Cook the onions for an additional 30 minutes or until they are a deep golden brown. Then cool slightly.
Heat the oven to 325 degrees fahrenheit. Place the slices of bread on an ungreased baking sheet and spray them with lightly with a non-stick cooking spray. You’ll bake these until the bread is crispy, roughly 9 minutes. If you don’t want to make our own crostini, you can usually find some at your local bakery and that works just as well.
In a small bowl, combine the goat cheese and cream cheese and blend until smooth. Then you are going place a teaspoon of onions onto each bread slice and top with the cheese mixture before sprinkling with herbs. Viola!
Smoked Salmon Crostini
Smoked salmon is another one of my all time favorite food items. I would seriously eat bagels with lox every single day if given the opportunity. Therefore it’s probably no surprise I am also a fan of smoked salmon crostini.
While this dish probably seems a little light for a winter recommendation, I always associate smoked salmon with the holidays because this was something my mom kept around the house to make breakfast a little easier. Nice and fresh with the perfect amount of saltiness from the capers and freshness from the cucumbers, this recipe brings me right back to those holiday mornings.
Ingredients
For the pickled cucumbers:
1/4 cup red wine vinegar or apple cider vinegar
2 tablespoons honey
1 English cucumber, cut into thin slices
For the crostini
1 baguette, cut into 1/4 inch slices
Extra virgin olive oil, as needed for brushing
For the cream cheese spread
4 ounces cream cheese, softened
1 teaspoon lemon zest
1 teaspoon lemon juice
1 tablespoon capers, drained and roughly chopped
1 1/2 teaspoons chives, finely chopped
1 teaspoon dill, chopped, plus more for garnish
For the crostini
6 ounces smoked salmon, thinly sliced
Freshly ground black pepper, for garnish
Instructions
Preheat the oven to 350 degrees fahrenheit and then set to work on pickling the cucumbers. You’ll do that by whisking together the vinegar and honey in a small bowl. Then add the sliced cucumbers, tossing to coat them with the marinade before letting them sit for at least 15 minutes, stirring halfway through. Before assembling your crostini, you’ll drain the cucumbers.
Next, you’ll toast the bread slices in the oven. Brush each side of the bread slices with olive oil before arranging them in a single layer on a baking sheet and then bake them until they are nice and crisp, flipping halfway through. This will take a total of about 10 minutes. Then remove and cool on a baking sheet.
Now you will combine the cream cheese, lemon zest, lemon juice, capers, chives and dill in a medium bowl (you can also make this ahead of time if you cover tightly and refrigerate). After this is ready, you can start assembling the crostini!
Spread a thin layer of the cream cheese onto the crostini and then top with three pickled cucumber slices and a slice of smoked salmon. Garnish each slice with chopped dill and black pepper.
Bacon Wrapped Dates
I personally love a sweet and salty appetizer, which is why my husband and I often opt for bacon wrapped dates when either hosting a party or attending a potluck. The crispness of the bacon makes these extremely snackable and they have a nice heartiness to them that makes it a perfect - and extremely easy - recipe for winter! I also like this recipe because it doesn’t include dairy, which can be a nice change of pace for an appetizer.
Ingredients
8 slices bacon (I prefer more thinly sliced because I think they crisp up better)
16 medium Medjool dates (opt for pitted - it will make your life so much easier!)
Black pepper (optional)
Instructions
First things first: preheat the oven to 400 degrees fahrenheit before preparing the bacon.
Next, prep the bacon by cutting each slice in half crosswise at a diagonal (think like how you would cut a ribbon). Starting with the straight end of the bacon, roll each piece around the dates and then tuck the point of the back “ribbon” to secure. Place each date seam side down on a baking sheet.
Place in the oven to cook for 10 minutes, then flip and cook until golden brown and crispy. This will take anywhere form an additional 5 - 15 minutes depending on the cut of the bacon and how you like it prepared.
Once done, season with black pepper if you wish and then let them cool before serving.
Fondue
I had never made fondue in my life until this month; it seemed a little too retro to me at first. However, we have this incredible bakery in town called Albemarle Baking Company and the thought of dipping their delicious sourdough bread in hot and melty cheese was finally just too tempting for me not to try.
I have been missing out!
Fondue is an easy and fun option for if you just want to have a lowkey night eating cheese and drinking wine in front of the fire. I am definitely adding this into my repertoire. Also - don’t let this ingredient list scare you off if you don’t cook a lot. I promise it’s very manageable!

Cheesy goodness paired with fresh baked bread is a perfect match
Ingredients
1/3 pound gruyere
1/3 pound fontina
1/3 pound gouda
2 tablespoons cornstarch
1 cup dry white wine
1 clove garlic minced
1 tablespoon fresh lemon juice
1 tablespoon brandy
1 teaspoon Dijon mustard
1/8 teaspoon nutmeg
Instructions
I don’t know about you, but I love to grate cheese (I find it weirdly soothing) and so this is a fun one for me. You start off by grating all three cheeses in a bowl and then you’ll evenly coat the cheese combo with cornstarch to help with clumping. Then you’ll set this aside.
In your fondue pot (I got mine at Target) or a large heavy saucepan, bring the wine, garlic and lemon juice to a boil. Slowly add the cheese mixture into the pot, stirring as you go to avoid clumping. Once the cheese has all been added and the mixture is smooth, add in the dijon, brandy and nutmeg.
There are a lot of options for what to serve with your fondue, but I like to keep it classic with a lovely sourdough. It complements the flavor of the cheese rather than just absorbing it; I like to visit our local bakery, as I feel like you want the best type of bread to match your fondue.
Warm Marinated Olives
I absolutely love olives. Whether it’s Kalamata or Castelvetrano or any variety in between, I could snack on olives every single day of my life. I realize this is not something everyone agrees with - I am often alone when ordering olive appetizers when out with my husband or friends. However, I find good lives to be life changing.
One of my favorite ways to eat olives - especially during the winter months - is heated in olive oil. The heat adds another layer to the flavors of these salty bites and they pair really well with other winter weather classics, like pizza and pasta. They can also add a nice touch to a simple charcuterie board, which is great for when drinking wine in front of a fire.

Nice and warm, I love this salty snack
*One thing to note: As I tend to be the only person eating these when I make them, I will often modify the recipe and it’s really easy to do. I’ll just opt for one type of olive and I’ll cut back on some of the other ingredients (like just lemon zest, half the garlic, etc.). This way I can still enjoy my olives without wasting any.
Ingredients
2 cups large green olives with pits, such as Castelvetrano (my favorite - I like to get my olives from the cheese section of the grocery store, as freshly packaged olives taste better to me than canned or jarred)
2 cups large black olives with pits, such as Kalamata
Zest of 1 orange, peeled in large strips (I actually prefer to sub this out with lemon, as I like the taste of lemon with it a bit more)
4 large garlic cloves, smashed (I like to do a rough chop on these)
2 teaspoons whole fennel seeds
2 teaspoons chopped fresh thyme leaves
3/4 teaspoon crushed red pepper flakes
Kosher salt and freshly ground black pepper
2/3 cup good olive oil
4 sprigs fresh thyme (I also like to swap this out for rosemary)
Instructions
Drain the olives from any brine in the packaging and place them in a medium bowl. Add in the zest, garlic, fennel, thyme leaves, red pepper flakes, salt and pepper. Pour the olive oil over the mix of ingredients, add in the thyme sprigs and then toss to combine really well.
Once you have everything mixed together, transfer into a sauté pan (or something like this adorable mini dutch oven from the Hearth & Hand™ with Magnolia line from Target; I like to use this, as it makes for easy and beautiful presentation as well). Heat the oil until the it sizzles and then lower the heat and sauté for 5 minutes while stirring until the olives and garlic are heated through.
Serve in the pan or serving dish with a separate dish for the pits. Be sure and warn your guests so they don’t risk hurting their teeth!
Cacio y Pepe Popcorn
What could be better on a cold night than curling up with a bowl of popcorn while watching a movie? It’s one of my favorite things to do, but sometimes I like to spruce my popcorn up a bit and that’s where this Cacio y Pepe recipe enters the picture. Made with butter, cheese and pepper, it’s a great twist on a classic snack.
Ingredients
1/3 cup popcorn kernels
1/2 cup finely grated Parmigiano Reggiano
1/4 cup butter
1-2 Tbsp olive oil
Freshly ground black pepper to taste
Salt to taste
Instructions
First things first: pop the popcorn. There are different ways to do this, but I usually opt for stovetop. Once popped, set it aside in a big bowl.
Next heat the butter, olive oil, pepper and grated parmesan on low until the butter melts. Be careful not to burn the butter mixture. Once it’s ready, pour the butter over the popcorn and then toss to coat. Salt and pepper the popcorn to taste and feel free to add more cheese based on your liking.
Southern Meatballs
When I saw a cast member make these on Bravo’s Southern Charm, I admittedly gagged. After all, why on earth would anyone want to put grape jelly in their meatballs? It just seemed so disgusting to me.
Then I realized this is my husband’s go to when we’re hosting people at our house. I’ve actually eaten this…and liked it! Plus, it is ridiculously easy. It’s a good addition to have on hand for a party or if you are doing one of my favorite types of dinners: Appetizer Dinner.
Ingredients
32 ounces frozen fully cooked meatballs
1 cup grape jelly, we like Smuckers brand
1 1/2 cup BBQ sauce, like Sweet Baby Ray’s
2 Teaspoons chili garlic sauce - I highly recommend this step, as they are definitely too sweet without a little kick
Instructions
I wasn’t lying when I said these were easy. Simply put all of the ingredients in a slow cooker. Stir everything together to mix well. Then you’ll cover and cook on low heat for 3-4 hours, stirring occasionally.
I will usually make these ahead of guests coming over and then just throw some chopped chives on top of the meatballs still in the slow cooker, allowing guests to take directly from there. Easy to cook, easy to eat, easy to clean up! It’s the best combination.
Sheet Pan Roasted Veggies
Full disclosure: I have a much easier time eating fresh vegetables in the summer. There’s something about eating fresh and cool vegetables when it’s hot out versus the winter when I just want to be warm. That is why I am such a huge fan of sheet pan roasted veggies when it’s cold outside - it is the best way for me to sneak in my nutrients without feeling chilled to the bone!
The other perk? This recipe is super easy with minimal cleanup.

I love all of the colors in this dish
Ingredients
2 large carrots
2 medium parsnips, peeled
2 medium beets, peeled
1 medium red onion
1 medium sweet potato
3 tablespoons extra-virgin olive oil
1 ½ tablespoons apple cider vinegar or balsamic vinegar
1 tablespoon fresh herbs, such as thyme, rosemary (always my favorite!) or sage
½ teaspoon kosher salt
½ teaspoon ground pepper
Instructions
To start, preheat the oven to 425 degrees fahrenheit and line two large baking sheets with parchment paper. Then get to work on preparing the vegetables.
Cut the carrots and parsnips into 1/2 inch thick slices. Cut the beets and onion into 1/2 inch thick wedges and cut the sweet potato into 3/4 inch cubes.
Now that your vegetables are chopped and ready, toss them with oil, vinegar, herbs, salt and pepper in a large bowl in order to get them really well coated. The seasoning is what makes this dish, so you want that nice and even coating on all of the vegetables.
Once coated, transfer over to the baking sheets in a single layer on each. You will then roast the vegetables until they are tender (test them by piercing with a fork). You can put one baking sheet on the top rack and one on the middle and then rotate these positions halfway through .Total cooking time in the oven should be around 30-40 minutes.
Caprese Panini
One of the off registry wedding presents my husband and I received that we absolutely love is our panini press. His boss got if for us with the advice that sometimes a simple sandwich can be the perfect dinner for two on those nights when we are tired and he was completely right.

Mozzarella is my favorite part of this panini
On the evenings where we are both exhausted and just want to enjoy dinner together without a lot of fuss, we always pull out the panini press and this is a go to recipe. It warms us up, it fills us up and it’s oh so easy.
Ingredients
2 pieces of sliced bread (like sourdough)
1 tablespoon of butter or mayo
1/4 cup pesto
1 large tomato, sliced
2 - 4 slices of low-moisture mozzarella
Handful of fresh spinach
Instructions
Like I said, this one is super easy. You’ll start by spreading butter or mayo onto the outside pieces of your bread. I like to go with mayo but my husband prefers butter so it’s whatever your preference.
Now you’ll build your sandwiches to your liking by layering the pesto, mozzarella, tomato and spinach and then adding more mozzarella and more pesto.
Finally, you’ll place your sandwich in your panini press on medium heat (or cook on medium heat in a skillet) until the outside of the bread has the nice golden brown color and the cheese is nice and melted. Dive right in!
Pasta in a Mug
Pasta in a Mug is, in my opinion, like getting a warm hug on a cold night. It is just a pure comfort meal and one I often make when my husband is working a later shift, as it’s super easy and can be made for one person. This is a frequent flyer in our dinner rotation.
Ingredients
6 tablespoons marinara sauce
Mozzarella cheese
2 teaspoons fresh basil, chopped
Rigatoni
Parmesan cheese
Instructions
Preheat the oven to 400 degrees fahrenheit.
Place half of the marinara sauce on the bottom of the mug and then top with a handful of mozzarella cheese and fresh basil. Top with the pre-cooked rigatoni and add the rest of the sauce. Then top the parmesan cheese and bake for 20 minutes.
As the mug will be very hot, I will flip the pasta into a bowl and mix all of the cheesy saucy goodness together before diving in.
Homemade (ish) Pizza
My husband LOVES pizza and so this is something we frequently make at home. It’s especially great on those cold winter nights when you just want to cozy up with a movie. I also like that it’s something you can be creative with when it comes to toppings.

Who doesn’t love having fun with toppings?
We use a pizza stone like this one. It makes it so much easier and is definitely worth it if you make these frequently but a cookie sheet will work just fine.
Ingredients
The best part about homemade pizza is you can have fun with the ingredients, but here are some definite musts for us:
Fresh pizza dough - we like to go local with our dough. There are a few stores in town where we can buy dough from a local bakery, but Trader Joe’s is another option we use.
Pizza sauce - we’ve tried a few, but we like to either go with a spicier tomato sauce or a regular tomato sauce. You can usually find these in the pasta aisle.
Cheese - Brendan likes to buy different cheeses and shred them for the pizza, but I’m usually okay with going low moisture mozzarella.
Toppings - have fun with it! My favorites are artichokes, black olives, and red pepper flakes but Brendan prefers pepperoni. It’s a good item to either go classic or crazy depending on your mood.
Instructions
Let the dough sit out in a bowl for about 30 minutes while the oven preheats at 500 degrees fahrenheit. Once it’s ready, you’ll place some flour on the pizza stone before rolling the dough out onto it. Then you are going to want to bake it “naked” for 3 -4 minutes.
After the naked bake, remove the pizza and add all of your toppings before placing back in the oven for 10-15 minutes. The crust will look brown and crispy when ready. Once cooked, take the pizza out of the oven and let it cool slightly before cutting into slices.
Margarita Chicken
Margarita chicken admittedly does not sound like a winter recipe to warm your soul. If anything, it sounds like something you should be eating while looking out at the beach and drinking a margarita, which is honestly why I love making this when it’s cold outside. It is a flavorful meal and it transports you to a warmer state of mind, which is sometimes what we need when dealing with winter blues.
I use the linked recipe as a guide, but I tend to go a little rogue. The ingredients and instructions are based on what I do.
Ingredients
One package of boneless, skinless chicken tenders (usually around 8 -10 tenders in a pack)
4 peeled garlic cloves
1 lime, sliced into rounds
Dash of lime juice
2 medium jalapeños, cut into thin slices
1/4 cup olive oil
Salt and pepper to taste
Instructions
Preheat the oven to 375 degrees fahrenheit.
In a bowl, place the tenders, olive oil, lime juice and salt and pepper. Mix everything together really well. Transfer the chicken tenders onto a baking sheet covered in aluminum foil. Make sure you are washing your hands thoroughly when touching things after handling raw chicken.
Places the jalapeño and lime slices on your tenders to your taste. If you have difficulty with spice, use sparingly and consider removing the seeds. Bake until chicken is completely cooked through, usually around 25 minutes.
This chicken is great to have with salad or in tacos.
Oven Roasted Rosemary Lamb Chops
This is one of my favorite things to make. It’s super easy, tastes delicious and it feels fancy. After all, going for a comfort dish doesn’t mean it can’t be elevated. The rosemary is the key ingredient for me, as it adds so much flavor to the lamb.
This pairs really well with roasted brussel sprouts bor a nice salad…and a glass or two of a hearty red wine.

Lamb with the roasted sheet pan vegetables
Ingredients
1/2 tablespoon of minced garlic
2 teaspoons of dried thyme or 1 tablespoon of fresh thyme
2 teaspoons of dried rosemary of 1 tablespoon of fresh rosemary
Salt and pepper to your liking
2 tablespoons of olive oil
2 lamb chops
Instructions
This recipe works really well if you allow the lamb to marinate. To do that, coat the lamb with the olive oil and then mix in the garlic, thyme and rosemary. You are going to want to coat both sides of the lamb to make sure you are really getting all of those flavors in every bite.
Once coated, place the lamb in a bowl and cover with saran wrap. This can be placed in the fridge for several hours to fully marinate. I would say doing this in the morning to cook in the evening is the ideal.
When you are ready to cook the lamb, preheat the oven at 400 degrees fahrenheit. While that’s preheating, put some oil in a cast iron pan and sear both sides (roughly three minutes per side). Then place the cast iron pan into the oven for 10 minutes. You’ll want your lamb to be served medium rare, so with some pink.
If you don’t have a cast iron pan, I will sometimes just line a sheet with aluminum foil and cook it in the oven until it’s medium rare. I’ve personally found this to be delicious as well - sometimes modifications are perfectly fine!
Sheet Pan Salmon
This will always be one of my favorite comfort recipes, as it is the first meal my husband made for me when we were dating. He was so proud of it and I loved it, as it includes some of my favorite foods to eat. The other nice bonus is it is super easy with minimal cleanup - he knows how much I hate messes, so it was a brilliant choice for him to make!
This is also a really healthy and filling meal, so it checks a lot of boxes while still being delicious. Plus, I will forever be a sucker when it comes to sentimentality and so this will remain a staple for me.
Ingredients
4 salmon fillets
1 pound asparagus - ends trimmed
2 pounds baby red or gold potatoes - quartered
3 tablespoons olive oil
Salt and pepper to taste
2 teaspoons Italian herb blend - see note
1 teaspoon garlic powder
2 tablespoons butter - melted
2 tablespoons honey
1 teaspoon dijon mustard
½ teaspoon Italian herb blend
½ lemon - thinly sliced
Instructions
Before you start, preheat the oven to 400 degrees fahrenheit.
Next, places the potatoes in a bowl with two tablespoons of olive oil, garlic powers, two teaspoons of the Italian herb blend and salt and pepper to taste. Toss to coat the potatoes thoroughly before arranging on a large sheet pan covered in aluminum foil. You’ll bake these in the oven for about 10 minutes.
While that cooks, whisk together melted butter, honey, dijon mustard and the remaining italian herb blend in a separate bowl.
Remove the pan and add the salmon and asparagus. Use a brush to coat the salmon with the butter mixture you just whisked together. Drizzle the asaparagus with the remaining olive oil and then salt and pepper to taste. Place the lemon slices between the asaparagus spears (or do what we do and place them on top - I feel like it adds better flavor).
Please the sheet pan back in the oven to bake for 15 minutes. You will want the asparagus and the potatoes to be fork tender and the salmon to be fully cooked through. You can tell salmon is done if it flakes easily with a fork, but I feel like I’m always second guessing myself so I instead prefer to get out my meat thermometer and see if it has reached 130 degrees. Once it’s ready, just pull it out of the oven and plate the meal. So simple!
And there you have it! Twenty one comfort recipes for winter to warm you right up. I hope you try and enjoy - and let me know what you think!
Cheers and happy cooking!